Friday, December 16, 2011

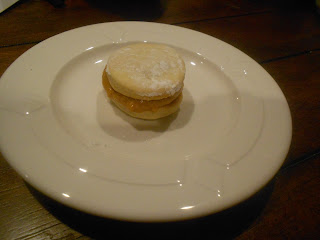
Cookies Day Six - The Grand Finale - Macarons with Dark Chocolate Ganache


I was very afraid of making these because I have never made them before. I have not even attempted to make meringues yet either, so I was not sure what I was in for. Thankfully enough it was not the total disaster I was expecting (there were a few casualties but not too many). Here is the basic recipe for the Macarons:

1 1/4 Cups Powdered Sugar
2/3 Cup Ground Almonds
3 Egg Whites (from three large to extra-large eggs)
Pinch of salt
3 TBSP Caster Sugar

In a mixing bowl combine the powdered sugar and ground almonds with a whisk until well distributed.
In a separate mixing bowl add the egg whites and salt and mix with an electric mixer with the whisk attachment. Beat until the egg whites start to form stiff peaks.
Continue beating the egg whites while adding the caster sugar 1/2 a teaspoon at a time until the sugar is well incorporated. By this point your egg whites should be completely white and forming firm stiff peaks. 
Continue beating and add your food coloring and any flavor you want (if desired)
Stop beating egg white mixture and start folding in the powdered sugar and ground almond mixture using a large scraper or metal spoon, adding the dry ingredients in 1 tablespoon at a time to ensure that they are well incorporated into the egg whites. The texture of the mixture should resemble that of molten lava.
Put your mixture in a piping bag with a tip that has a smooth round opening about 3/8 inch in diameter (I used the Round Tip 12 in my Wilton decorating set).
On a baking sheet lined with parchment, start piping the mixture into nice even rounds about 1 to 2 inches in diameter. Leave about 1 inch in between each round.
Once done piping make sure to strongly tap the bottom of the baking sheets to displace any trapped air bubbles.
Let the trays rest for at least 15 minutes to allow them to set. You will know when they are ready because they will not feel sticky or wet when you touch them. They will have developed a dry coat while still having a little give.
Preheat your oven to 320 degrees Fahrenheit. Place one baking tray in oven at a time ensuring that they are centered in the oven.
Bake for 10 minutes or until the tops are hard and shiny and the bottoms are dry. Repeat with any other ready to go baking sheets.
Remove from oven and leave to cool.
In the meantime start making your chocolate ganache.

Poor Man's Dark Chocolate Ganache

15 TBSP Good Quality Unsweetened Cocoa Powder
5 TBSP Vegetable Oil (preferably Extra Virgin Olive Oil)
3/4 Cup Heavy Cream
1 TBSP Light Brown Sugar

In a mixing bowl add the oil and slowly add in your cocoa powder to ensure that the powder is well incorporated and does not form any lumps. Once the mixture is well formed into a nice chocolate paste set it aside.
In a small sauce pan add the heavy cream and heat it up. Slowly incorporate the brown sugar and bring the cream to a boil.
Once the cream is boiling remove from heat and immediately start incorporating into the chocolate paste. Using a mixer on low speed start mixing the cream and the chocolate until you have a soft, smooth and creamy chocolate mixture.
Let the mixture cool a bit. Bring over your macaron halves and place as much ganache as desired on one half and sandwich it with the second half.

Enjoy :)


Thursday, December 15, 2011

Cookies Day Five - Simple Chocolate Biscotti


I had mixed opinions about biscotti. The flavor combinations were always very enticing, but it was always the rock hard texture of these treats that made them a less desirable option. That was until I learned how to make them at home. I was able to get them to a texture that still had a crunchy exterior but would not break your teeth when you tried biting into them. I also learned that the simpler the recipe (less added ingredients) the better. Here is the recipe:

Simple Chocolate Biscotti

2 1/4 Cups Flour
2/3 Cup Cocoa Powder
1 1/2 Cups Sugar
1 tsp Baking Powder
3 Large Eggs
2 Egg Yolks
1 TBSP Vanilla Extract

Preheat oven to 350 degrees Fahrenheit.
Mix the dry ingredients in a large mixing bowl. 
Mix the eggs, egg yolks and vanilla extract in a separate mixing bowl. 
Add the dry ingredients to the wet ingredients a little bit at a time to ensure that they are incorporated evenly. Once all the ingredients are well incorporated divide your dough in half. place each half on separate baking sheets and shape each into a log approximately 3 inches wide by 10 inches long and about 1/2 thick. This dough will be very dense but very easy to handle so it will not be too cumbersome for you to shape.
Place baking sheets in oven and bake for about 20 minutes.
Remove from oven and allow to cool for about five minutes.
Slice loaves into 1/2 to 3/4 inch thick pieces. 
Place the slices back on the baking sheets spreading them just slightly apart and place them back in the oven for another 5 minutes.
Remove form the oven cool and serve with a nice cup of tea or some creamy hot chocolate.
Enjoy :)

Wednesday, December 14, 2011

Cookies Day Four - Alfajores de Dulce de Leche :)


One of the many reasons I love my stepfather (other than he is the best stepdad anyone could ever have) is the fact that, were it not for him and the fact that he is Argentinian I might have never had Alfajores. My first experience with these tasty treats was when my parents arrived back from a trip to Argentina and my mother brought us a very generic/commercialized version of Alfajores. I admit that I absolutely loved them but only until I met their original counterparts. My husband and I had this distinct pleasure when we went to Argentina and had them at a local bakery. The bakery ones wiped the floor with the commercial version. There was no contest.

I never thought I would be able to find a recipe for alfajores that I could make at home, but the great Martha Stewart has proved me wrong. For her recipe complete with how to make your own dulce de leche follow this link.

If you like rich desserts or treats these cookies are definitely for you.

Cookies Day Three - Mini Linzer Tarts

I have always loved linzer tarts. To me they just speak of childhood. I have never been to a place where they were not available, so I guess in a way I find them comforting because they are familiar (and absolutely delicious). Here is the recipe:

1 Cup (2 sticks) salted butter, room temperature
1/2 cup granulated sugar
1 large egg
1 teaspoon pure vanilla extract
31/2 Cups flour, plus more for work surface
1 teaspoon baking powder
1 teaspoon ground cinnamon
1/4 teaspoon ground nutmeg

Cookie Cutters: 1) 2 1/2 Inch diameter and 1) 1 Inch  diameter

Powdered sugar, for dusting
Raspberry jam for the filling

Put the butter and sugar in a mixing bowl and combine until light and fluffy. Add the egg and mix until well incorporated. Add the vanilla extract and mix until well incorporated.
In a separate bowl combine the flour, baking powder, cinnamon, and nutmeg. Whisk until the dry ingredients are evenly distributed.
Add the dry ingredients to the butter mixture slowly to ensure even integration and to prevent clumps.
Divide the dough in half and flatten each half  into a disk. Wrap the disks in plastic wrap and place in the refrigerator for at least 1 hour.

Preheat oven to 350 degrees Fahrenheit. Take out one of the dough disks and roll out on a floured surface. Roll dough out to about 1/4 inch thick.
Cut out disks using the 2 1/2 inch diameter cookie cutter.
Cut out the center of half of the disks using the 1 inch diameter cookie cutter.
Place the disks onto cookie sheets and place in the oven.
Bake for 15 to 20 minutes until the edges of the cookies brown.
Remove from the oven and allow to cool.
Once cool separate the hollow disks from the whole ones and dust the hollow disks with powdered sugar.
Take the whole disks and put a generous amount of raspberry jam on each of them (how much is entirely up to you but try to make it so that it is not so much that it will become a mess when people bite into the cookies).
Place the powdered hollow disks on top of the whole ones with the jelly on top and bask in the wonderful glow of the perfect fruity, sweet treat.

Enjoy :)

Tuesday, December 13, 2011

Cookies Day Two Revisited - Short Bread Lemon Curd Sandwiches


Finally here it is the cookie I was intending to make yesterday. In this one the filling was the first thing I was thinking about and then I had to think about what kind of cookie would make a great compliment for it. I know that lemon is not exactly the king of filling one would generally think about during this time of year. I just thought that it would be excellent for bringing a little of that summer brightness and feeling that those of us who don't live in warm climate areas during this season, wish we could have. So here is the recipe for both the cookies and the lemon curd filling:

Shortbread Cookies
Yields about 6 Dozen

1 Cup (2 sticks) Salted Butter
1 Cup Powdered Sugar
1 tsp Vanilla Extract
2 1/4 C Flour

In a large bowl combine the butter and sugar with a mixer until the sugar is completely incorporated and the mixture looks light and fluffy. Add the vanilla extract and mix until well incorporated. Slowly add the flour in. Toward the end of mixing this dough you might need to stop your mixer (if it is a small handheld one. If you have a kitchen aid you don't need to worry about this) and knead the dough with the heel of your hand in order to ensure the flour is evenly incorporated throughout the dough. The dough will have a consistency almost like pie crust dough except a little heavier. Separate half the dough and roll into a cylinder about 1 1/2 to 2 inches in diameter. Roll the cylinder into a sheet of saran/plastic wrap. Repeat this step with the remaining half. Refrigerate the dough for at least an hour to allow the dough to firm.

While your dough is resting in the fridge you can set to the task of making your lemon curd. Here is the recipe adapted from the one I found in Macarons-Chick and Delicious French Treats by Annie Rigg:

Lemon Curd

3 Egg Yolks
1 TBSP Heavy Cream
1/3 Cup caster/superfine sugar
3 TBSP unsalted butter
Grated Zest and Juice from 1 Lemon

You can make the curd using either a double boiler or simply a heatproof bowl over a pot of slowly boiling water over medium low heat. Place your butter in the bowl and let it melt down. Slowly add in the sugar to ensure that it incorporates evenly into the butter and preventing it from creating lumps. Beat the egg yolks and heavy cream together and slowly add the mixture into the batter stirring frequently using a whisk (you want to temper your egg mixture in, otherwise you will wind up with a sweet scrambled egg mess).At this point you should have a nice thick sauce in your bowl. Add in the lemon zest and juiceand continue to stir frequently until the curd is thick enough to coat the back of a spoon. In all the entire process should take you about 15 to 20 minutes. 

Now bake your cookies. Preheat oven at 350 degrees Fahrenheit. Take out your dough cylinders and cut into 1/4 inch slices. Place on baking sheets about 1 inch apart. Place in oven and bake from 15-20 minutes or until the edges start to brown.   I would like to mention that if you have an oven that does not heat evenly it is best to place your baking sheets on the rack that is furthest from the heat source in order to ensure that the cookies are baked evenly since these are a bit thicker and heavier than most other cookies.

Once your cookies are baked and cooled start making your sandwiches with the lemon curd use as much The recipe for the curd will fill about 36 sandwiches if you use a little over 1/2 teaspoon for each. Ofcourse if you want to be more generous with this filling (and who could blame you) you should probably double the recipe for the curd so that you can fill cookies to your hearts content. 

I hope you enjoy these.

Monday, December 12, 2011

Cookies Day Two - A Happy Mistake Lace Cookies

 I think I must have been high (on what I do not know...probably just tired) when I copied the recipe for what were supposed to be short bread cookies. In any case, I miscalculated the amount of flour that was supposed to go into the dough. I had a nagging feeling that the consistency of it was still too lose when I was putting it in the saran wrap to make two rolls of dough, but I chucked it up to my crappy handheld mixer and cursed it yet again for not being able to give me the proper consistency. I let the dough rest in the fridge for the rest of the day while I went and tried to get some final Christmas gifts together. When I came back from this venture I set to the task of thinly slicing the rolls of dough, put the slices on the baking sheets and proceeded to put them in the preheated oven. About five minutes into baking I went to turn on the oven light so that I could check on the progress the cookies were making. As I did my heart sank. the dough was a thin flat bubbling mess. Or so I thought. I took out what I was getting ready to qualify as a baking disaster and set it aside to wait for the mess to cool off so that I could scrape it off. 

It was only after they cooled off and I picked the first one up that I realized that maybe this was not the great disaster I thought it could be. Although thin, the cookie remnant I picked up was firm and crispy and perfectly round, so I took a tentative bite and I thought I heard an angel choir belt out the most perfect of notes. 

Man I thought I was so screwed and here was this thin tasty cookie. I can't even begin to tell you how relieved I was that it didn't suck. It was not what I had intended to make at all but I am glad that it was not a complete loss. So here it is, the recipe of my disaster turned yummy goodness:

Nydia's Almost Disaster Lace Cookies
Yields about 4 dozen

1 Cup (2 Sticks of salted butter)
1 Cup Powdered Sugar
1 teaspoon vanilla extract
1 Cup Flour


Mix the butter and the sugar (with a nice mixer that obeys the laws of low and  high speeds, not a crappy handheld one) until they are nice and fluffy. Add the vanilla extract and mix in until well incorporated. Add the flour in slowly to incorporate evenly into the batter. remove half the dough and scoop it in onto a sheet of saran wrap so that you can shape it into a nice even dough tube using the saran wrap to contain the dough like a sausage about 1to 1 1/2  inch in diameter. Repeat this step with the remaining half and place both cookie dough sausages into your fridge to cool and firm up for at least and hour. 

Preheat oven to 350 degrees Fahrenheit. Take out the dough from the fridge and slice into 3/8 inch thick slices. Place the slices on your baking sheet about 2" apart. Place baking sheets in oven and be prepared to take them out after about 5-7 minutes later. Or if you prefer you can watch them until you see the disks of dough turn into thin bubbling sheets and their edges start to brown (or if you prefer let them brown completely). Take them out of the oven and let them cool before removing from the baking sheet. 

Now you can either eat these on their own or you can use them as awesome decorations on a bowl of ice cream.

I will still be posting the cookies I was intending to make today as I have rectified my flour quantities and am in the process of getting my dough ready for the oven. Stay tuned.

Sunday, December 11, 2011

Six Days Of Cookies - Day One Gingerbread People with Lemon Drizzle


I am a bit late with my Holiday cookie making, but as it has been said before, better late than never. The first batch of cookies are these cute gingerbread people. I got the basic recipe for the cookies along with the lemon drizzle recipe from the Martha Stewart Site. However I am not sure it was a result of my crappy handheld mixer or the recipe itself, but I found that the dough came out too soft so I had to add some more flour to it to get it to the consistency I needed for the gingerbread peeps to be solid enough to transfer to the baking sheets. The lemon drizzle was perfect. I  decided that instead of drizzling it I would pipe it onto the cookies so that I could create the eyes mouth and center patterns. My daughter and husband have taste tested them extensively and their verdict is that these are good eats.

This was a great start for the bakeorama that will ensue in the coming days here in my home. Hope all of you are having as much fun with your holiday baking as I am so far.

Thursday, December 8, 2011

Something to look forward to


With the holidays already well underway I have something to definitely look forward to. I ordered Macarons- Chic & Delicious French Treats by Annie Rigg as an early Christmas present to myself. Of course this means that those cookie gifts I am planning on putting together will definitely benefit from this addition to my culinary library (rest at ease family and friends). 

I love Macarons because they are beautiful to look at, but most importantly they can also be tiny little pieces of heaven come to cheer up your sweet taste buds. I am almost as giddy as a five year old on Christmas Eve waiting for this book to arrive. I guess this also means that I will be posting with the results of this venture into the unknown. I love a challenge.

Wednesday, December 7, 2011

Polpette in Park Slope - Now That's a Tasty Hero


 Yesterday was my husband's birthday, which meant that he was the master of the day and got to pick what it was that he wanted to do and eat. Since he had been craving a meatball hero for a while he asked if we could check out Polpette in Park Slope. This was a huge success because he has finally found what he has declared the perfect meatball hero. We started out with Vinny's Potato Salad, which was fantastic because unlike typical potato salads, this one was not overpowered by the awful acidity of vinegar. It was a smooth tasty medley of roasted red bliss potatoes sweet peppers and garlic aioli, with some other secret ingredients.

Vinny's Potato Salad

I ordered Josephine's Famous meatballs with mozzarella plated a la Strazzare, which means the meatballs were crushed inside a soft roll. It was tasty and filling and everything a great meatball sandwich should be.


 My husband ordered the Porco Due Eroe, which entailed pork meatballs topped with fennel sausage with tomato cream sauce in hero bread. It was all sorts of wonderful and he almost looked like Rachel Ray while he was eating it, right down to the orgasmic finale.
 

Polpette definitely delivered the quintessential meatball hero. We will be back for sure.

Sunday, December 4, 2011

Wonton Potato Curry Pockets - AKA Curry Puffs without the puff


These little treats are jam packed with flavor. They were inspired by Thai restaurant curry puffs which I have been wanting to make for a long time. I was trying to put together a dinner because One of my husband's cousins was coming over. I made my Thai Style chicken with the coconut curry sauce, jasmin rice and some steamed broccoli, but I was feeling like we should have a pre-diner snack, so I concocted a recipe and tried to put it together with the least amount of hassle.

For the filling:

2 TBSP butter
2 Medium Shallots (sliced thin)
2 large cloves of garlic (minced)
1 Green onion (sliced thin)
2 large Yukon gold potatoes (Diced)
1 Large carrot (diced)
2 TBSP Mild Yellow Curry powder
1/2 Cup of water


For the pockets:

1 Pack of wonton wrappers


Recipe:


Melt the butter in a medium sauce pan on medium heat. Add the shallots, garlic and green onions until the shallots become translucent and  start to caramelize. Add the potatoes and carrot and cook for 5 minutes stirring frequently to prevent ingredients form burning. Add the water and curry making sure to add the curry powder slowly to prevent lumps. Cook until the water is reduced enough to make a thick gravy. 


Set the filling aside and get your wonton wrappers ready by slicing them diagonally to create triangles. Once this is done start getting your Pockets together. The pictures below show the step by step procedure on how to fold your wrappers and get them ready for frying/sauteing.

 place your wonton triangle on a flat surface

 Place about 1 teaspoon of filling 
at the center of your wonton triangle

 Make your first fold as shown above.

 Make your second fold as shown above.

 Make your third fold as shown above.

Finally tuck the last corner under to complete your triangle shaped pocket.

To cook these simply fry in a large pan with a thin layer of Safflower or canola oil until they are golden brown on both sides. Serve with either duck sauce or red chilly dipping sauce. Enjoy.

Thursday, December 1, 2011

Apple Pie Cupcakes


Apologies for the very amateur looking pics but I had to take these in a hurry since I could not predict if the cupcakes would disappear like smoke after my little girl and husband got a hold of them. I got the recipe for the cupcakes from one of my new favorite blogs Bake, Robot!. I adapted only two things about the recipe. I made my own apple filling and I made up my own icing recipe. Here are the recipes for both:

Apple Filling

3 medium sized Gala Apples (cored and cut into 1/4" squares)
1 1/2 TBSP Butter
1 Small Stick of Cinammon
2 TBSP Sugar

In a small sauce pan melt the butter on medium heat and immediately add the apples and stick of cinnamon. Slowly incorporate the sugar so that it has a chance to incorporate evenly into the apples. Cook mixture for about 15 minutes stirring frequently to prevent burning. Stirring will also help to thicken up the filling. Take off the burner once the filling has reached your desired consistency. Set aside to insert into the center of your cupcakes once they are cooled off. I so wish i had one of those cute and helpful Williams Sonoma cupcake corer. Must pick one up soon.  


Cinnamon Butter Cream Icing

1 1/2 Sticks of Butter (in small cubes)
Powdered Sugar (about 2 cups or so depending on your taste)
1/4 Cup whipping cream 
1 TBSP Cinnamon (freshly ground preferred)

Place your butter in a medium bowl and using your mixer on a medium high setting soften the butter until it becomes creamy. Start adding powdered sugar a little bit at a time alternating with the whipping cream until you achieve the consistency and level of sweetness you desire. If you want it a little heavier add more powdered sugar. If you want it a little softer add a little more whipping cream. Finally add the cinnamon until it is evenly incorporated into the icing. Now put this bad boy on your apple filled cupcakes and give yourself some sweet loving. I promise these will love you back.

Sunday, November 27, 2011

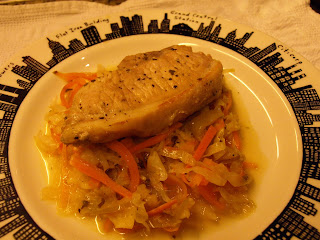
Sage Rubbed Pork Chops with Apple Slaw

This post is another one from my other blog's archive that I thought needed to find its way on this blog just so that I can start keeping all my food stuff together. The recipe is from Food Network's website, which I visited in order to find some inspiration on what to do with the food I had at hand. I found this great recipe for pork chops by Ellie Krieger, so I went with it. My husband said that he enjoyed the vegetables just as much as he enjoyed the pork. I accompanied it with a bit of garlic infused jasmine rice. The following are some progress shots I took while preparing the food as well as a final result shot. I can sincerely say it was delicious and not complicated at all.


The pork chops after a little searing

The sauteed apple, sage and onion mixture

The mixture after the cabbage, vinegar and carrots were added


The Final Result
Tomorrow I am trying out a cupcake recipe I found on one of my favorite blogs Bake, Robot! so that I can get myself going again.

Tuesday, November 22, 2011

Roast Chicken with Couscous


Today has been a wet dreary day which made me think that a nice roast chicken stuffed with something nice and aromatic might just be the thing to make for diner. What else could be better to compliment the roast chicken, than couscous infused with the juices left over form the roast chicken. Here is the recipe:

1 Whole Chicken (cleaned)
2TBSP Olive Oil
4 Garlic Cloves (Minced)
Salt and Pepper to taste
1 tsp Mild Yellow Curry

Pre-heat oven to 420 degrees Fahrenheit.

Place the olive oil, minced garlic, salt, pepper and curry in a wide deep bowl and whisk together. Place your chicken in the bowl and coat it in this mixture. Set aside.

For the cooking base:

1 TBSP Olive Oil
1/2 Red Pepper (finely chopped)
2 Shallots - medium (thinly sliced)

In a dutch oven heat the olive oil on medium high heat. Add the red pepper and shallots and saute until the shallots start caramelizing. 

For the aromatic stuffing:


2 Green onions (sliced lengthwise)
3 Sprigs of Cilantro
4 cloves of garlic (smashed)

Stuff your chicken with these and place it in the dutch oven with the caramelized shallots and red pepper. 

Add to this 3 cups of water and one large carrot (cut in thick slices about 1/4 inch thick). Cover the dutch oven and place in the oven for about 1hr, checking in about every 20 minutes or so to baste. 


Remove dutch oven from oven and check to make sure chicken is cooked through. Uncover and return to the oven for an additional 5-10 minutes to allow the skin to brown.


Remove the chicken from the dutch oven and place on a baking dish to allow to rest. 


For the couscous:

At this point there should be about 1 cup to 1 1/2 cups of rendered juices left in your dutch oven (if it is less than this add some more water and heat up a bit, checking to make sure that the flavor of the juices is right for your palate). 

On the stove top heat the rendered juices to a boiling point and then turn off the burner.

If this is your first time making couscous all you have to know is that the ratio of liquid to couscous is 1 to 1. Add the amount of couscous corresponding to the amount of liquid you have in your dutch oven. Cover the dutch oven and let it rest for about 5 minutes to allow the couscous to absorb all the tasty fluids.

Fluff the couscous with a fork and serve along with your favorite chicken parts. Enjoy :)

Monday, November 21, 2011

Carrot & Ginger Scones

Yeah I have been on a scone kick lately. This is a bit of a variation on my cranberry date scones, posted about three days ago. This recipe uses a little more flour to offset the moistness added by the carrots. Anywhoo here is the recipe:

Carrot & Ginger Scones  (Yields about 12-14)

For the chunky ginger simple syrup:

1 Cup of Sugar
1 Cup of water
2 TBSP Ginger (diced into little tiny pieces)

Put the water in a small sauce pan and heat it to a boil. Take off burner and add the sugar to make simple syrup. Add the ginger and put your sauce pan back on the burner this time at a low heat for about 20 minutes, allowing the ginger to infuse the simple syrup. Stir frequently. Raise the heat slightly so that the syrup bubbles a bit stirring frequently so that the sugar will not caramelize, until the syrup reduces by about 1/4. The goal is to make a thick clear ginger syrup with ginger bits to add to the scone mix. 


For the scones:

12 TBSP Butter (1 1/2 sticks)
2 1/2 Cups of flour

1 TBSP Baking Powder
1 tsp salt
Chunky ginger simple syrup
2 Eggs
1/2 Cup of Milk
1/2 Grated Carrots

Preheat your oven to 400 Fahrenheit. In a bowl mix the flour, sugar, baking powder and salt and set aside. Put your butter in a mixer and beat until softened and creamy. Start adding in half of the flour mixture a little at a time to allow the flour to incorporate into the butter. Add the ginger simple syrup. Add the remaining half of the flour mixture adding little by little alternating with the milk and the eggs. Add the grated carrots. 


Scoop the dough into baking cups either closely clustered together on a baking dish (if you want to give them a rustic look) or in a cupcake pan (if you like your baked goods to look perfect). Fill the baking cups half way to allow room for the scone to rise. Bake for approximately 20-25 minutes or until the outside of the scones is a golden brown checking with a toothpick to make sure the inside is cooked through.

Serve drizzled with honey or with your favorite jams, butter or whipped cream and a nice cup of coffee or tea. Hope you enjoy these as much as I did making and eating them. 

Sunday, November 20, 2011

Easy Cilantro Infused Chicken


Here is a nice easy recipe for those days when you just want to have as little fuss as possible. It is not just easy it is also very tasty. Anyway here you go:

4 Large chicken legs (Either whole or with thighs separate from drumsticks)
2 TBSP Olive Oil
3 Large Garlic Cloves (minced)
3 TBSP Cilantro leaves (chopped)
2 tsp Mild Yellow Curry
3/4 C Water
Salt & Pepper to taste

Preheat oven to 420 degrees Fahrenheit.

Put the olive oil, garlic and cilantro in an oven dish and mix together. Add the chicken and coat in the mixture. Place the chicken pieces with  the skin side facing up. Sprinkle the chicken with the curry, salt and pepper. Add the water, cover and put in the oven.

Cook Chicken for about 25-30 minutes (until well cooked through) allowing the chicken to simmer in the cilantro mixture.

Uncover and baste the chicken with the liquid in the baking dish, and cover again for another 10 minutes.

Change your oven form baking to broiler setting. Take out the oven dish and uncover, basting the chicken again and place back in the oven for an additional 5- 10 minutes to allow the skin to brown and crisp to desired point.

Serve with your favorite sides and enjoy.

Saturday, November 19, 2011

The Amateurs' Pork Fried Rice


I did not cook today because there were just too many great leftovers in the fridge. However I would like to share with you the recipe for my very amateurish but still delicious home made Pork Fried Rice. This recipe will give you 4 to 5 heaping servings.

Ingredients:
2 Cups uncooked white/jasmine rice (prepare separately before hand)
2 large boneless Pork Chops - chopped into 1/2" cubes
4 cloves of garlic - crushed
4 green onions - chopped
1 red pepper - chopped
1 large carrot - shredded
2 Tbsp olive oil
3 eggs
3 Tbsp of butter
3-4 Tbsp Soy sauce

Prepare the rice separately and start preparing other ingredients while it is cooking. In a wok or deep pan heat the olive oil at medium high heat and add the garlic, green onions and red pepper. Saute the ingredients for about 5 minutes stirring frequently. Add the carrot and saute for 1 more minute. Add the pork chop cubes and saute until they are cooked through. Lower heat to a medium low.
Slightly beat the 3 eggs. In a frying pan heat 1 TBSP of the butter until it is melted and add the eggs. once they are cooked through to a firm point, take off the heat and put on a cutting board chopping into small chunks. Add them to the pan with the pork and vegetables and mix them in making sure to break up any large lumps. Add the cooked rice and mix well. Add the soy sauce and mix well.
Viola! you have made home made fried rice.
Enjoy :)

Thursday, November 17, 2011

Fluffy Cranberry & Date Scones


Today I had the great pleasure of having gone of my very good friends over for a long overdue visit. She is a wonderful British lady with a fantastic sense of humor and a great outlook in life. She also knows how to perfectly pair alcoholic libations with pretty much anything, which is one of the many reasons I thinks she is the bees knees. Seeing that she was coming by for the afternoon I decided to make another batch of my date tortellini (see post from two days ago), but I had also promised her we would have some other sweet treat. I was a little stomped until I had a sort of moment of clarity and though "hey maybe you should make some scones too". So without further delay here is the recipe I concocted today:

Cranberry Date Scones (Yields about 12-14)

12 TBSP Butter (1 1/2 sticks)
2 Cups of flour
3 TBSP Sugar
1 TBSP Baking Powder
1 tsp salt
2 Eggs
1/2 Cup of Milk
1/2 Cup Dried Cranberries
1/2 Cup Diced Dates

Preheat your oven to 400 Fahrenheit. In a bowl mix the flour, sugar, baking powder and salt and set aside. Put your butter in a mixer and beat until softened and creamy. Start adding in half of the flour mixture a little at a time to allow the flour to incorporate into the butter. Add the eggs and the remaining half of the flour mixture adding little by little alternating with the milk. Add the cranberries and the dates. 


This dough will be a little looser than your typical scone dough but the end result will be a nice fluffy scone. In order to bake these babies properly I suggest putting them in baking cups either closely clustered together on a baking dish (if you want to give them a rustic look) or in a cupcake pan (if you like your baked goods to look perfect). Fill the baking cups half way to allow room for the scone to rise. Bake for approximately 20-25 minutes or until the outside of the scones is a golden brown checking with a toothpick to make sure the inside is cooked through. 


Allow to cool slightly and serve with your favorite jams and butter or clotted cream if available. Enjoy.

Tuesday, November 15, 2011

Where's the beef?


Why in my stew, of course. Have I mentioned how much I love my dutch oven? This has been my best stew to date. Not to toot my own horn, but hey why be modest TOOOOT TOOOT!!!! Here is the recipe (serves 4):

1 1/2 Pounds lean beef round (cut in bite size cubes)
4 Cloves of Garlic (minced/crushed)
4 Shallots (thinly sliced)
1 large celery stalk (thinly sliced)
3 Cups of water
4 Medium sized carrots (sliced)
5-6 Yellow fleshed Petite Idaho potatoes (cut into quarters)
2 tsp mild yellow curry
3 Medium to large bay leaves
Salt and pepper to taste.

In either a medium sized dutch oven or stew pot, heat 1-2 TBSP of olive oil on medium high heat. Add the garlic, shallots and celery and saute until fragrant. Add the beef cubes, allowing the meat to brown. Add the water followed by the carrots, potatoes, curry, bay leaves and salt and pepper. Lower the heat to medium low and allow the ingredients to simmer for about 2 hours stirring every 20 minutes or so. Uncover for about 10 minutes at the end of cooking time to allow the juices to reduce and thicken a bit. Serve and enjoy.

Sunday, November 13, 2011

Date, Ricotta and Parmesan Stuffed Pasta

 Pasta dough disks

Date, Ricotta & Parmesan Filling

Filling the pasta disks

Shaping the filled pasta disks

Pasta ready to go into its jacuzzi

 
The end result

 This is a recipe that I concocted to try to match a dish that my husband and I loved from MORE in Dubai. Their dish is called the celebration pasta, which I mentioned in my other blog. The dish consists of tri-colori tortellini filled with a date ricotta filling. Since I only knew the two main ingredients involved in the filling I winged it a bit. I also have never attempted making tortellini before so I apologize for the amateurish looking ones I made. Here is my adapted filling recipe as well as the link to the recipe I used to make the pasta for the tortellini:

Filling:


1 Container of whole milk ricotta cheese - 15 oz (425g) 
15 to 20 large, plump dates
2 TBSP fresh grated Parmesan cheese
Salt and pepper to taste


Preparation:


If you have a food processor (I am jealous) put your ricotta in and add the dates pulsing to ensure the dates are integrating evenly into the cheese. Then add the remaining ingredients until they are well integrated. 

If you (like me) do not have a food processor, start by dicing your dates as small as possible. Place your ricotta in a medium sized mixing bowl. Add the  diced dates and integrate them into the cheese as evenly as possible. Incorporate the rest of the ingredients into this mixture as evenly as possible.


Set filling aside and get your pasta ready.


Pasta:


After you make your dough separate a third of the dough, set the remainder aside and take the necessary precautions to ensure the rest  remains moist. Roll out your dough until it is about 1/8 of an inch thin or thinner if possible (the thinner the less time it will take for the pasta to cook through).


Once the dough is well rolled use a circular cookie cutter (about 3" diameter max recommended) to cut out as many dough disks as possible. Set disks aside ensuring that they remain moist by placing them in a container with a moist towel on top. 


Repeat the steps above with the dough set aside earlier.


Now it is time to fill your pasta. 

Place a small ball (about 1/3 the diameter of your pasta disk) in the center of the disk. Wet the edge of the pasta disk. Fold the disk pressing the edges of the disk firmly together starting at the top center and then doing one side at a time so that you will not trap air in the pocket where the filling was placed. 


Shape the pasta into the tortellini shape by pinching and folding the sides. 


Place the tortellinis on flat dishes or baking sheets in rows with some room between each piece so that they will not stick together.

The yield on the tortellini will probably be about 4 1/2 dozen

At this point you can either make your pasta or you can store it in your freezer in an air tight container for up to two weeks. 


When you do decide to use it I recommend a nice garlic butter sauce, and top it off with fresh grated Parmesan.
.
 

Thursday, November 10, 2011

More Comfort Food, Because I Am Worth It


Today I was really craving something that would lift my spirits. Nothing can lift spirits up like food that reminds you of childhood, and nothing reminds me of childhood more than red beans. I used to love when my mom made these for me. I get the feeling my daughter feels the same way when I make them for her. Perhaps this is becoming a tradition. Here is my recipe:


1 Bag Red Kidney Beans (aprox 1 lbs, cleaned and rinsed) (I highly recommend Goya)
4 Cups of water
1 TBSP Extra Virgin Olive Oil
4 Large Cloves of Garlic (crushed or minced)
2 Green Onions (sliced thin)
1 large celery stalk (sliced thin) 
1 Plum/Roma tomato (De-seeded and diced)
1/2 Red Pepper (diced)

1 Large Carrot (grated)
2 Bone in Pork Chops
Salt and Pepper to taste

Put the red beans and 4 cups of water in a deep pot. Turn on burner on high heat and let the water reach a boil. Lower the heat and allow the beans to continue to simmer.

In a medium to large dutch oven add the oil, heat and add the garlic, onions, celery, tomatoes and red peppers and sweat them stirring frequently until the celery becomes translucent. Add the carrots and allow them to sweat and integrate into the other ingredients to form a nice thick base. 


Add the beans, pork chops, and about 1 more cup of water into the dutch oven with the vegetable base. Cook on high until everything is simmering. Season with salt and pepper to taste. Lower the heat to medium low and allow the ingredients to stew, stirring every 20 minutes or so until the beans are tender and the meat on the pork chops falls off the bone. Enjoy.


Tuesday, November 8, 2011

Oh Mother of Sweetness!!!

Crumbs bakery has done it again. Yup, they nearly killed me with an overdose of delicious, delivered via their cupcake of the month Chocolate Pecan Pie. If you are into the traditional southern pecan pie, you will also appreciate this adaptation. A delectable chocolate cupcake, with a rich chocolate ganache center topped off with a caramely, chocolatey, pecan drizzled cream cheese frosting. I almost fell into a sweet induced coma and was only brought back by their great coffee. I totally recommend this cupcake and the ensuing experience to anyone needing a little sweet lovin'.

Monday, November 7, 2011

Comfort Food Day: Lentils


 As the weather gets colder I find myself craving the type of comfort food that used to make me feel warm and fuzzy when I was a child. Of course I have adapted my old favorites, incorporating spices as my mood might dictate. One of those favorites is lentils, which I favor not just because they reek of childhood memories, but also because they are a great, no-fuzz nutritious meal. Here is my recipe:

2 1/2  Cups Green Lentils (cleaned and rinsed)
5 Cups of water
2 Large Boneless Pork Chops (cut into 1/2 inch cubes)
2 TBSP Extra Virgin Olive Oil
4 Garlic cloves (crushed/minced)
3 Green Onions (sliced thin)
1/2 Large Red Pepper (diced)
1 Large Carrot (grated)
2 Large Yukon Gold Potatoes (Cubed)
1 TBSP Mild Yellow Curry
Salt and Pepper to Taste


In a large pot add the lentils and water and cook on high heat until boiling. 
In the meantime start cooking the pork chop cubes in a large pan on medium high heat, stirring frequently  until they are golden brown on the outside and cooked through. Please (and I cannot emphasize this enough) make sure that your boneless pork chops have a nice fatty edge. This will be important as you cook the meat in order to render the fat to allow the meat to cook in its own fat. 


Remove the pork from the pan, making sure to leave behind whatever fat the meat has released. Add the pork to the pot with the water and lentils.

Add the olive oil onto the pan where the pork was cooked, followed by the garlic, green onions and red pepper. Saute these ingredients for about five minutes to allow them to sweat and release their aromas and flavors into the pan. Add the carrot and allow it to sweat for two minutes. Add this mixture to the pot of lentils, followed by the cubed potatoes, curry and salt and pepper.

Lower the heat to medium low and allow the lentils to cook and the flavors of the meat and vegetables to mingle. Cook until the lentils are soft. Serve and enjoy.

Thursday, November 3, 2011

Chicken Thighs in Coconut Curry cream


I know I have been posting a lot of Chicken recipes lately. It is partly due to having a restricted budget. It is mostly because I have also renewed my love for it because it just tastes so darn good and because it is so flexible and can be made with so many different sauces. Today I am sharing a very easy recipe because it is made with a few store bought pastes. Here are the ingredients and recipe:

Half a dozen medium to large chicken thighs (skin on is OK and preferable)
1 TBSP Extra Virgin Olive Oil
Two large cloves of Garlic (minced)
1/2 cup of water
Salt and pepper to taste
1 can of coconut milk
3 tsp Green Curry paste (I use Thai Kitchen brand)
4 tsp Roasted Red Chili Paste (Thai Kitchen brand)
1 tsp mild yellow curry powder (get this from your local indian/spice market)
1 inch piece of fresh ginger (sliced thin)
1 Blade of fresh lemongrass (sliced thin)
4 large Basil leaves
1/2 large red pepper (in thin slices)


Heat the olive oil in a large roasting pan or medium dutch oven add the garlic and chicken thighs and cook until the skin is a light brown color. Add the water, salt and pepper and cover the pan. Simmer on high heat for 20-25 minutes to allow the chicken to cook through and render its juices. 

Remove the chicken and the rendered juices from the pan leaving only about 2 Tablespoons of the rendered liquid in the pan. (At this point you can also remove the skin from the chicken if it had any on it) Set the Chicken aside while you make the creamy curry sauce.

Put the coconut milk in the roasting pan with the 2 TBSP of juices that were left in it and allow it to warm up on medium high heat. Slowly incorporate the green curry paste, roasted red chili paste and yellow curry into the coconut milk. Incorporating the ingredients slowly ensures that your sauce will be creamy and smooth by allowing you to break up any lumps that start forming (especially when you add the yellow curry powder). Bring to a simmer and add the ginger, lemon grass and basil and allow the flavors to seep in for 5 minutes.

Put the chicken thighs back in the pan and coat with the curry cream. Cover the pan and allow the chicken to simmer in the sauce for about ten minutes. Add the red pepper slices and cover again for an additional five minutes.

Voila! your chicken is ready to serve with whatever accompaniments you feel like having. I usually like serving it over rice so that the rice can absorb any sauce that drips down from the chicken.